Crop
Volumes Crop
The Volumes Crop module allows for efficient cropping of one or multiple volumes simultaneously using a customizable Region of Interest (ROI). It supports Scalar, Vector, and LabelMap volumes, ensuring that all related data can be processed with a consistent spatial boundary.
Panels and their usage
 |
|---|
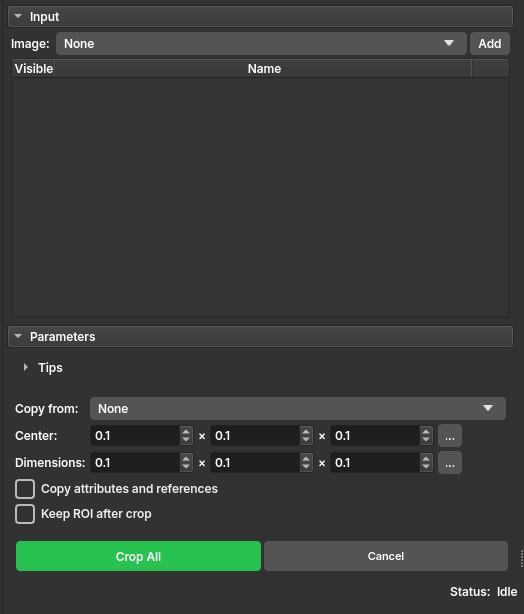
| Figure 1: Presentation of the Crop module. |
Main options
Input - Image: Select an image and click Add. You can add multiple images to the list; they will all be cropped using the same ROI configuration. Use the radio buttons in the Visible column to choose which volume to use as a reference in the slice views.
Parameters - Copy from: (Optional) Select an existing ROI to define the crop region. - Center: Set the precise center of the crop in IJK coordinates. Click the ... button to select from the last 10 used configurations. - Dimensions: Define the crop size in the three dimensions (X, Y, Z). Click the ... button to select from the last 10 used configurations. - Copy attributes and references: If checked, the cropped volumes will inherit metadata, attributes, and references from the original volumes. - Keep ROI after crop: If checked, the temporary ROI will be kept as a permanent node in the scene after cropping.
Actions - Crop All/Cancel: Buttons to start the batch cropping process or cancel and clear the list.
Usage
- Select the images to be cropped and add them to the table.
- Adjust the ROI interactively in the slice views or manually via the Center and Dimensions fields.
- (Optional) Hold the Alt key while dragging ROI anchors in the slice views to resize symmetrically around the center.
- Click Crop All and wait for completion. The cropped volumes will appear in the same subject hierarchy folder as the original volumes.