Manual Registration
The Thin Section Registration module is designed to register thin section and QEMSCAN images, allowing the user to align images by adding landmarks to both. After selecting corresponding landmarks in the fixed and moving images, the module applies transformations to ensure accurate registration.
Initialization
 |
|---|
| Figure 1: Introduction to the Manual Registration module. |
Main options
The Manual Registration module interface is composed of several panels, each designed to simplify the loading and processing of QEMSCAN/RGB images:
-
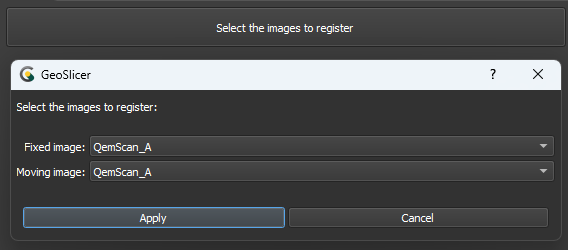
Select images to register: This button starts the image selection for registration.
-
Fixed image: Choose the reference or fixed image.
-
Moving: Choose the image that will be transformed to align with the fixed image.
-
Apply/Cancel: Accept or cancel the image choices.
Panels and their usage
 |
|---|
| Figure 2: Overview of the Manual Registration module. |
Main options
The Manual Registration module interface is composed of several panels, each designed to simplify the loading and processing of QEMSCAN/RGB images:
Visualization
 |
|---|
| Figure 3: Overview of the views in the Manual Registration module. |
-
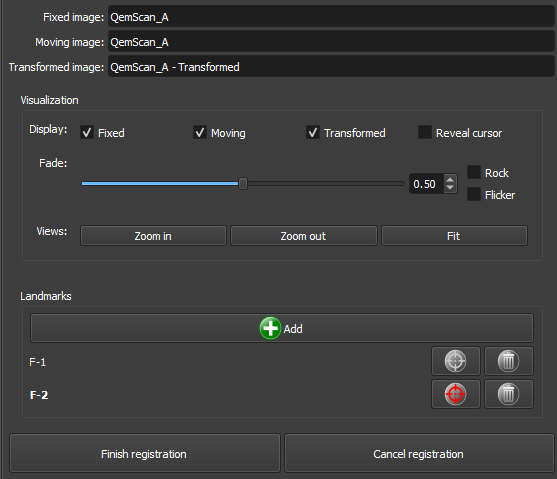
Display: Checkboxes for visualization tools. Fixed image: Display the view with the fixed image, Moving image: Display the view with the image to be transformed, Transformed: Display the interactive view with the transformed image, and Reveal cursor: Display the transformation region in the view with the transformed image.
-
Fade: Choose the transparency of the transformed image in the interactive view with the transformed image.
-
Rock/Flicker: Rock or transparency variation effects for the transformed image in the interactive view with the transformed image.
-
Views: ZoomIn/Out: Choose the zoom level of the views. Fit: Resets the zoom level of the views to display the entire image.
Landmarks
 |
|---|
| Figure 4: Overview of the landmarks interface. |
-
Add
 : Add a reference point that will be replicated in the views with the fixed image and the image to be transformed.
 -
 : Remove a reference point that will be replicated in the views with the fixed image and the image to be transformed.
 -
 /
/  : Activates/Deactivates the position editing of a reference point that will be replicated in the views with the fixed image and the image to be transformed. Only one can be edited at a time.
 - Finish/Cancel registration: Finish or cancel the registration edits. If finalized, use the transformed image for subsequent processes.
Automatic Registration
The Thin Section Auto Registration module is part of the Registration category and aims to automatically register thin section images, using segmentations of fixed and moving volumes. It allows defining input images, configuring output prefixes, and applying transformations to align the images.
Panels and their usage
 |
|---|
| Figure 1: Presentation of the Auto Registration module. |
Main options
The interface of the Auto Registration module is composed of several panels, each designed to simplify the loading and processing of QEMSCAN/RGB images:
-
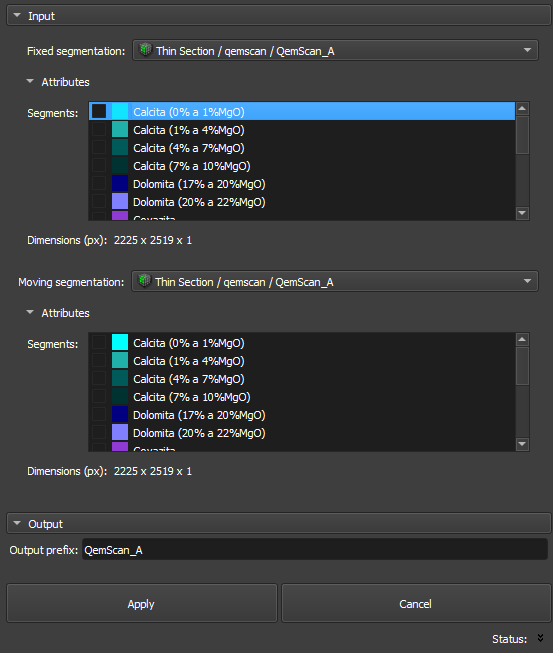
Fixed segmentation image: Choose the reference or fixed image.
-
Moving segmentation image: Choose the image that will be transformed to align with the fixed image.
-
Segments: Choose the segments of the image to be transformed to be used for registration optimization.
-
Output prefix: Define a prefix that will be applied to the results, facilitating the organization and identification of output files.
-
Apply: Initiates the registration process, applying transformations that align the moving segmentation to the fixed segmentation.
-
Cancel: Interrupts the process at any time, if necessary.
Flows
Volume Cropping
The Crop module to crop a volume, as described in the steps below:
- Select the volume in Volume to be cropped.
- Adjust the desired position and size of the ROI in the slice views.
- Click Crop and wait for completion. The cropped volume will appear in the same directory as the original volume.
Image Tools
The Image Tools module allows image manipulation, as described below:
- Select the image in Input image.
- Select the tool in Tool and make the desired changes.
- Click the Apply button to confirm the changes. These changes are not permanent and can be undone by clicking the Undo button; they will be discarded if the module is left without saving or if the Reset button is clicked (this will revert the image to its last saved state). Changes can be made permanent by clicking the Save button (this will alter the image and cannot be undone).
Registration
The Register module to register thin section and QEMSCAN images, as described in the steps below:
- Click the Select images to register button. A dialog window will appear that allows the selection of the fixed image (Fixed image) and the moving image (Moving image). After selecting the desired images, click the Apply button to start the registration.
- Add Landmarks (anchor points) to the images by clicking Add in the Landmarks section. Drag the Landmarks as desired to match the same locations in both images. You can use the various tools in the Visualization section and the window/level tool located in the toolbar to assist you with this task.
- After completing the placement of the Landmarks, you can click the Finish registration button. Transformations will be applied to the moving image to correspond to the fixed image, and the result will be saved as a new transformed image in the same directory as the moving image. You can also cancel the entire registration process by clicking the Cancel registration button.